
TTE usage tips
This is an initial collection of some advice on how to more effectively use TableTop.Events. We will add to it as we go along.
General
Help yourself by logging into your TTE account – and if you are an HMGS Member, your hmgs.org account – a few days before Attendee Registration opens, so we can help with any account access issues before Badge sales opens.
Remember to fully checkout after adding things to your cart – if you don’t they will be automatically removed from your cart after 2 hours.
Help us by keeping your account profile data up to date, so we can more easily match profiles on the two systems, when we need to. For Event Hosts, we recommend using the same email address in your account profile for both systems.
To view the Exhibit Hall map, select Venue under the Attend menu item, and then select Exhibit Hall in the drop-down.
TTE Event Schedule tips
The TTE Schedule of Events (which only shows Scheduled Events; i.e., not pending Event Submissions, or Approved Events) defaults to some standard settings when you open it. There are some changes you can make to potentially improve your experience.
Displayed Fields
The default fields are:
- [Event] Number
- [Event] Name
- [Event] Type
- Starts [at]
- Duration
- Available
- Room

There is also a Buy column on the left which will display a Buy button (if there is a charge for the Event) or Get (if there is no charge).
No button will display if there are no available tickets for that Event.
Filtering & Searching
The page filters (above the Event list) default to All Events/All Days/All Start Times.
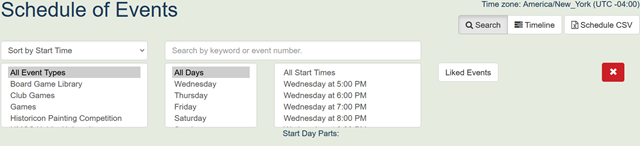
These filters are multi-select fields, so you can select one filter and then hold the CTRL key on your keyboard to select another (e.g., if I’m only interested in the Games, I could select “Club Games” and “Games”.)
Next to these filters is a “Liked Events” button which is also a filter (more about Liked Events below).
The main limitation with the current filters is that they don’t filter on our custom fields, like Period or Rules (we have requested that TTE look at adding this functionality).
The Search field will search all fields, so if – for example – you’re looking for a particular Period, Rules, or Game Host, you can use this capability.
The Events
In the list of Events, a number of the default fields are hyperlinked.

The Event Type, Starts, and Room fields act as filters when you click on them. The Number and Name field take you to the full Event page.
Part of the Event Name field (to the right of the name) is two icons.
The lower is a dark blue circle with a white “i” in it. Hovering over that icon will show the beginning of the Event Description.
Above the “i” icon is a square with a check in it. Clicking on this icon adds the Event to your “Liked Events” list, which you can use the filter button discussed above to just show your Liked Events. You can add and remove items on your Liked Events list as much as you want. See the My Schedule section below for how you could use your Liked Events.
Pagination
By default the Schedule of Events only shows 10 Events on a page. By using the “items per page” drop down, you can increase that to 20 or up to 100 (in increments of 20).
Columns to Show
Below the list, you can choose which fields display in the list – including our custom fields.

I remove the Number field, Room field, and usually the Event Type field (especially if I’m already filtering by Event Type).
If I’m looking to add things to my Liked Events and Ticket sales is not open, I will remove the Available column.
I usually add the Hosts, Period and Rules fields.
You can experiment with adding the other fields to see what works for you. Some of the custom fields are only available with certain Event Types.
Extra Filters
- Don’t show past Events
- Don’t show sold out Events
- Don’t show cancelled Events
Schedule CSV
If utilizing these abilities is not for you, you can click the “Schedule CSV” button (towards the top right) to download a .csv file of all the Events.
This file is only generated once every 24 hours (i.e., it is not generated in real-time when you click the button), so it may not match what you can see in the Events Schedule page.
TTE My Schedule tips
Under the Attend menu item, below the Events Schedule item, is My Schedule.
I use this view to see what Events I have liked that overlap, and to narrow down which Events I want to go after. You can do this “early and often”, as soon as Scheduled Events start showing up on the EVents Schedule page.
After Ticket sales open, you will also be able to see the Tickets you have, and also any that are still sitting in your cart.